
Using Storyline 2 with Learning Pool Learning Record Store
October 27, 2014

For those of you that follow along on with Learning Locker on Github, you will have noticed that we recently became compliant with the CORS part of the xAPI spec. This is good news for Storyline 2 users who can now use Learning Locker to store their tin can statements.
This blog will show you how to use Storyline 2 without a Learning Platform which is useful for quick demos and understanding what a platform like an LMS actually does to your Storyline 2 project. (If you have an LMS I suggest you take a look at Articulate’s step by step process for using a Storyline 2 project with an LMS).
Step 1: Get Your LRS Information
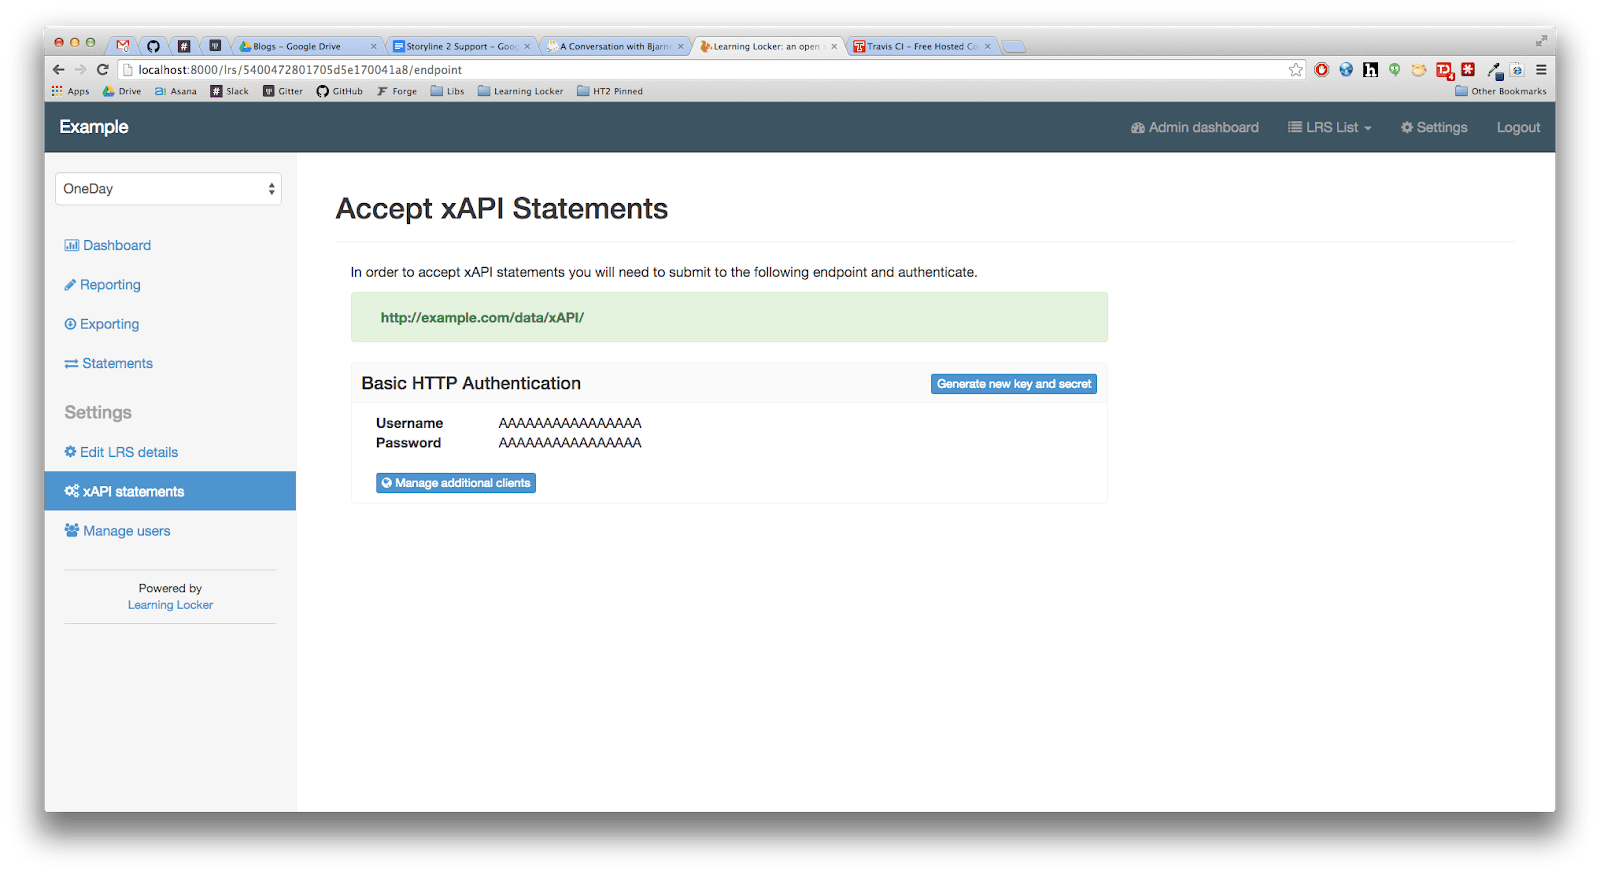
Before you can publish your Storyline 2 project you’ll need to find out the endpoint, username, and password of your LRS (see the screenshot below).
To do this you need to open up Learning Locker in your browser, select your LRS from the LRS List dropdown in the top right, then go to xAPI statements on the left hand side.
In my example (seen in the screenshot below), my endpoint is “https://example.com/data/xAPI/” (trailing slash is required), my username is “AAAAAAAAAAAAAAAA”, and my password is “AAAAAAAAAAAAAAAA”.
Step 2: Get Your Basic Authentication
You need to encode your username and password to create your basic auth details, I suggest you use this online encoder.
You need to type in your username and password in the format “username:password”, click “convert the source data” and you should now see the Base64 representation of your username and password (see the screenshot below).
The string “Basic “ is prepended to this Base64 representation to create your basic authentication. For example, my basic authentication would be “Basic QUFBQUFBQUFBQUFBQUFBQTpBQUFBQUFBQUFBQUFBQUFB”.
Step 3: Create an xAPI Actor
You also need to create an actor, this is the person that is doing the activities and will be stored with all of the statements. See my example actor below.
{“mbox”:”mailto:[email protected]”, “name”:”Example User”}
Step 4: Publish Your Storyline 2 Project
- In Storyline, go to the Home tab, and click Publish.
- Select the LMS option on the left edge of the publishing window.
- From the LMS drop-down list at the bottom of the window, select Tin Can API.
- Click the Reporting and Tracking button.
- In the Launch URL field, type the full URL to the story.html file where it’ll be hosted.
- In the Activity ID field, type a URL to represent the activity (without a protocol – “https://”). For example “www.example.com/my-activity” would be fine.
- Add the endpoint, basic authentication, and actor you found earlier as url params. You should also add the “registration” param, you can use this generated UUID for that “2981c910-6445-11e4-9803-0800200c9a66“. My Launch after adding params (copy the link address).
- You should also URL encode your url parameter values which you can do by using an online encoder. My Launch after encoding(copy the link address).
- Click OK, and complete the publishing process.
Step 5: Use Your Project In Your Browser
Open up your browser of choice (i.e. Chrome, Firefox, etc) and navigate to the Launch URL from step 4, part 5. You should be presented with your Storyline 2 project which you can now use.
Step 6: View Your Activity on Learning Locker
Navigate to Learning Locker in your browser, select your LRS from the LRS List dropdown in the top right, then go to Statements on the left hand side. You should now see the activities that you completed in Step 5.
Next Steps (and Some Thanks)
A learning platform like Learning Pool Platform is capable of dynamically adding the URL parameters in Step 4; Part 7 which would allow your content to use multiple endpoints and actors. You should be able to drop your published projects into an Learning Platform to make this slightly easier. Articulate have provided a step by step process for doing this. As always, you can give us feedback via Github, Gitter, and the Google Group.
We would also like to say thanks to @davidpesce @hallshouse @amirfazamin @garemoko for their help with this on Github in issue #371 and #535.
Got a learning problem to solve?
Get in touch to discover how we can help